CE DataScience Setup Guide
This guide is the fastest path from a fresh machine to a working ce-datascience
install. Use Bash on macOS, Linux, WSL, or Git Bash. Use PowerShell on native
Windows.
Visual Overview
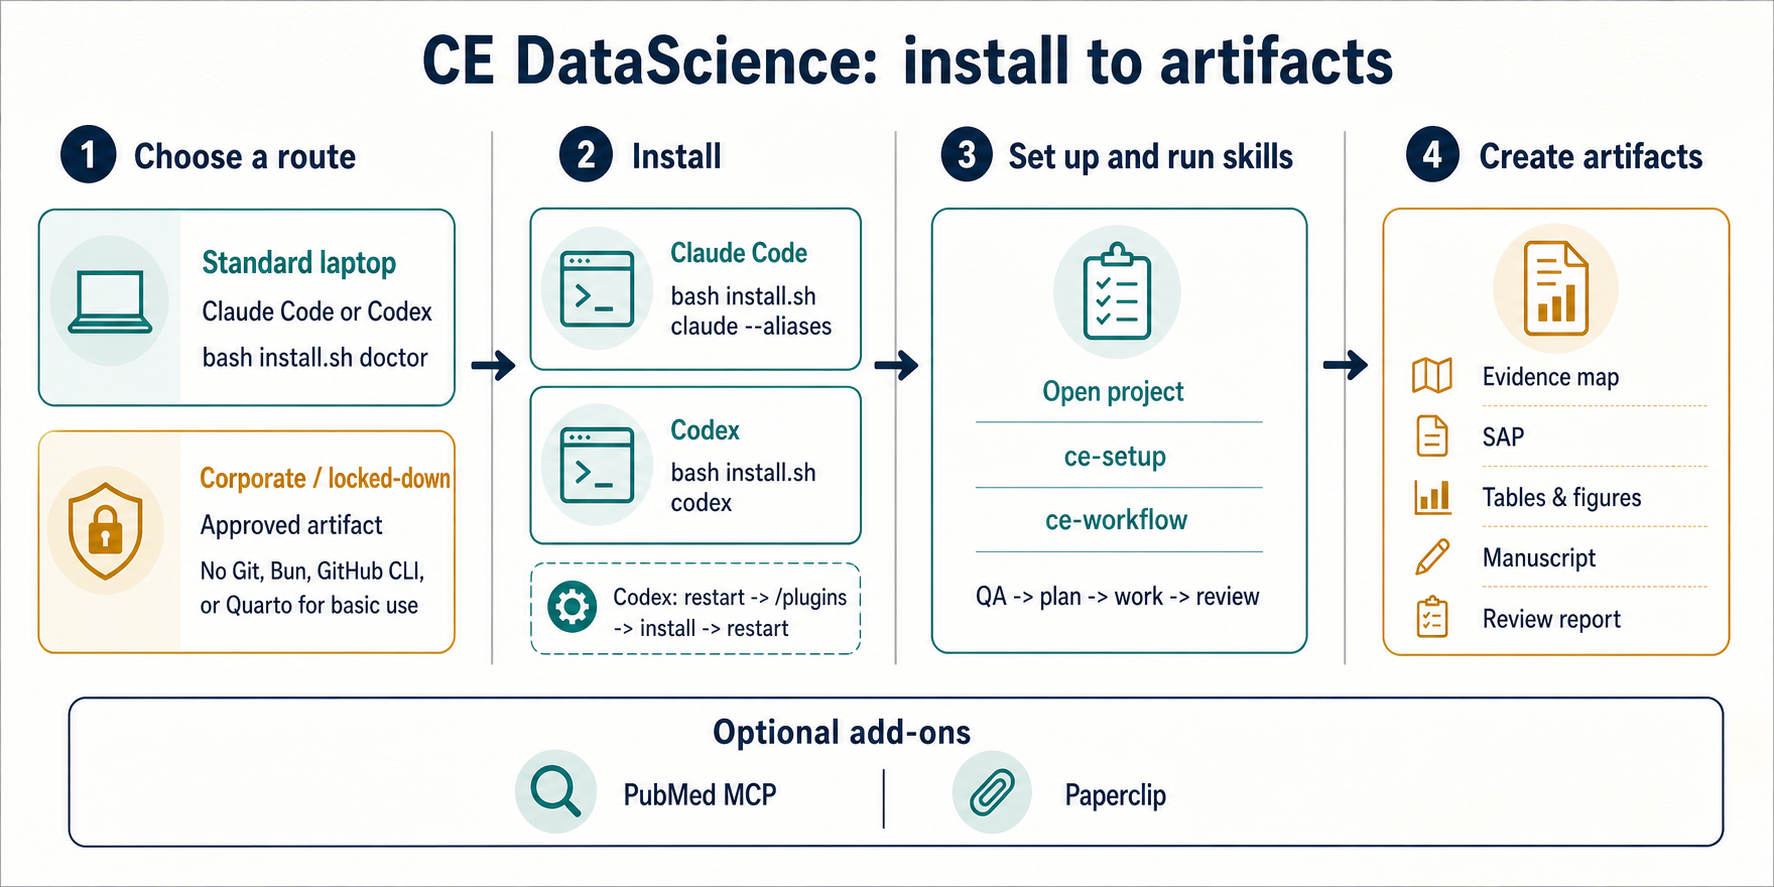
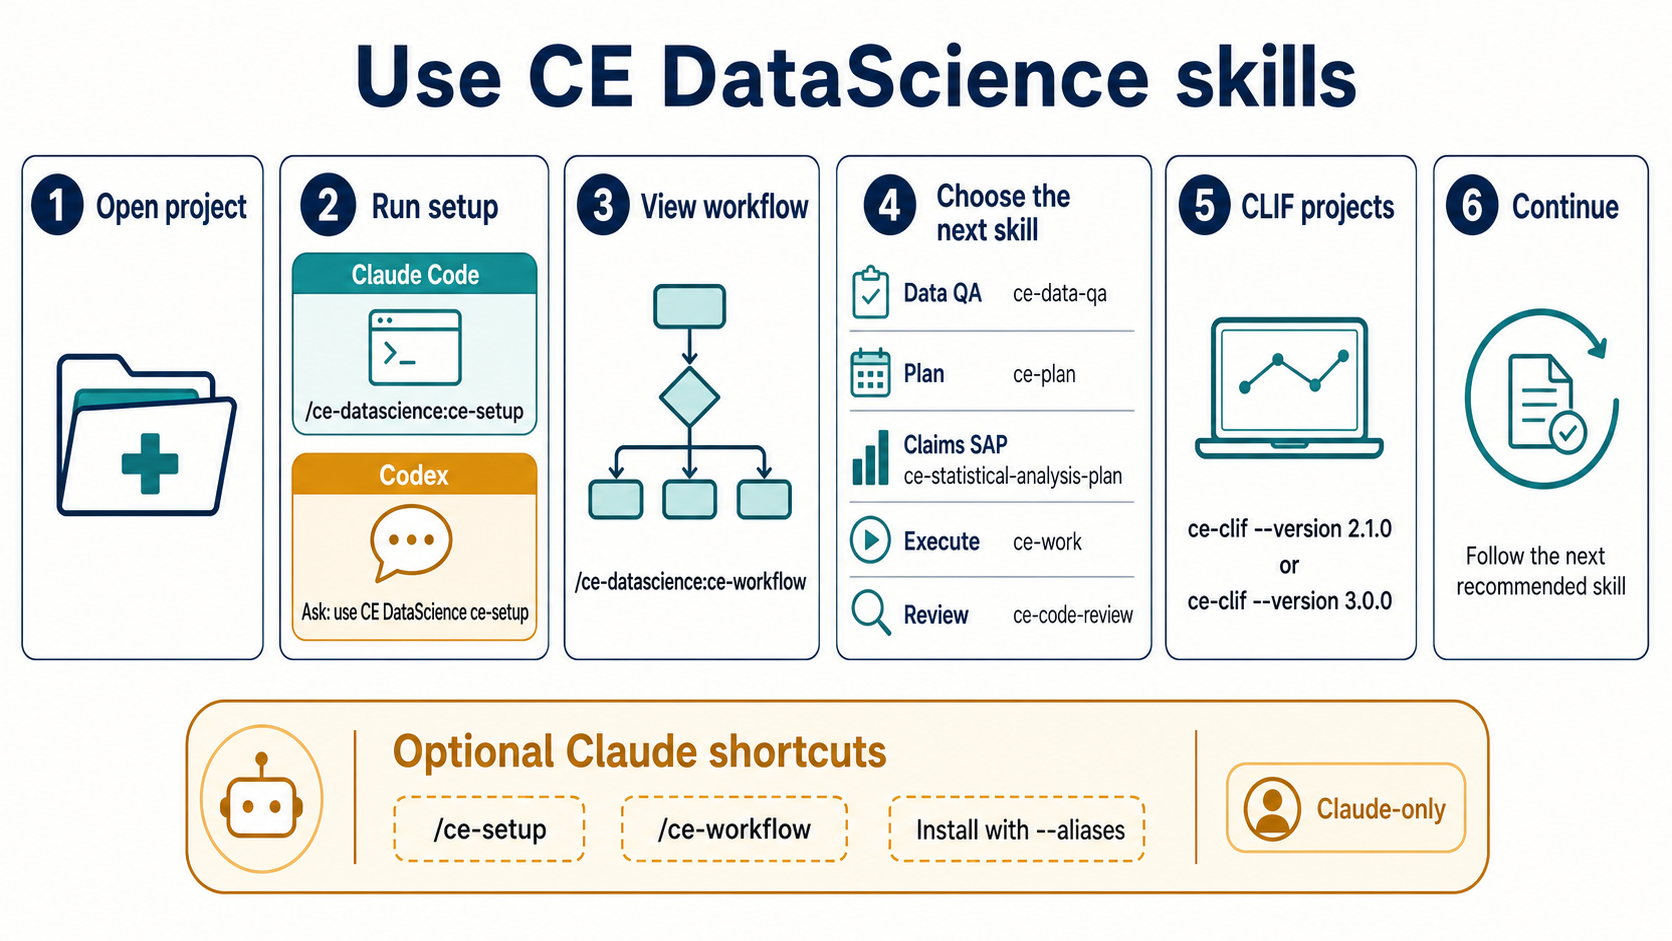
OS Support Matrix
| OS | Recommended shell | Easiest command | Notes |
|---|---|---|---|
| macOS | Bash or Zsh | bash install.sh claude --aliases or bash install.sh codex | Fully supported and tested locally on macOS. |
| Linux | Bash | bash install.sh claude --aliases or bash install.sh codex | Covered by Bash syntax tests and temp-root install tests. |
| Windows with WSL | Bash inside WSL | bash install.sh claude --aliases or bash install.sh codex | Use Linux paths inside WSL, such as /mnt/c/... only when needed. |
| Windows with Git Bash | Git Bash | bash install.sh claude --aliases or bash install.sh codex | C:/Users/... paths are accepted by the Bash helper. |
| Windows PowerShell | PowerShell | .\install.ps1 claude -Aliases or .\install.ps1 codex | Native Windows path handling and Codex offline install support. |
Choose Your Install Route
If you have a source checkout, run the read-only install check first:
bash install.sh doctor
On Windows PowerShell, use:
.\install.ps1 doctor
The check reports whether the checkout or approved artifact is recognized and whether the local Claude, Codex, and optional Bun tools are available. Use the standard route below on a personal or managed laptop that can run Git and the agent CLI. On a locked-down or corporate laptop, skip source-build tooling and use the approved offline artifact route in section 2.
1. Easiest Install Path
This mirrors the original Compound Engineering plugin experience: install once, then run setup.
Claude Code
macOS, Linux, WSL, or Git Bash:
git clone https://github.com/sajor2000/ce-datascience.git ~/ce-datascience
cd ~/ce-datascience
bash install.sh claude --aliases
claude
Windows PowerShell:
git clone https://github.com/sajor2000/ce-datascience.git "$HOME\ce-datascience"
cd "$HOME\ce-datascience"
.\install.ps1 claude -Aliases
claude
Then open the target project and run:
/ce-datascience:ce-setup
The helper registers the local Claude marketplace and installs the plugin. The
namespaced command is the reliable default. --aliases is optional and adds
safe local bare /ce-* demo commands.
Codex
macOS, Linux, WSL, or Git Bash:
git clone https://github.com/sajor2000/ce-datascience.git ~/ce-datascience
cd ~/ce-datascience
bash install.sh codex
codex
Windows PowerShell:
git clone https://github.com/sajor2000/ce-datascience.git "$HOME\ce-datascience"
cd "$HOME\ce-datascience"
.\install.ps1 codex
codex
Inside Codex, run /plugins, install CE DataScience, restart Codex, then
start a new thread and ask Codex to use CE DataScience for setup. If Bun is
available, the helper also installs the generated CE agents into the selected
CODEX_HOME.
Pi
Pi uses the generated installation path rather than a native marketplace.
pi install npm:pi-subagents
pi install npm:pi-ask-user
cd ~/ce-datascience
bun run src/index.ts install ./plugins/ce-datascience --to pi --pi-home "$HOME/.pi/agent"
Restart Pi, open the project, and invoke ce-setup using Pi's normal skill
interface. pi-subagents is required for CE subagent workflows; pi-ask-user
is recommended for the compact setup confirmation.
What the easy installer does
| Target | Installer action | Required finish |
|---|---|---|
| Claude Code | Registers this checkout as a local marketplace, installs ce-datascience, and optionally creates managed bare /ce-* aliases | Restart Claude Code, open the project or study directory, then run /ce-datascience:ce-setup or the optional /ce-setup alias |
| Codex | Registers the local marketplace and, when Bun is available, writes the generated agent bridge into the selected CODEX_HOME | Restart Codex, open /plugins, install CE DataScience, restart again, then start a new task in the target project |
| Pi | Writes generated CE skills, agents, and prompts under the selected Pi home | Install pi-subagents, restart Pi, open the target project, then invoke ce-setup |
The installer does not configure every research project globally. The
ce-setup skill creates project-local configuration after the plugin is loaded.
Run setup again when a different project uses a different language, IDE, data
layer, or reporting workflow.
What setup asks
Setup inspects manifests, lockfiles, notebooks, imports, IDE files, existing CE configuration, verified database handoffs, and data-file patterns first. It shows a single detected-profile card and offers Continue with detected profile, Adjust a field, or Full survey. The normal path leaves optional library, statistics, environment, reporting, data-root, blinding, and checklist choices unset until the active workflow needs them; unknown language is never silently treated as mixed R + Python.
2. Locked-Down Or Demo Laptop
Locked-down laptop or team demo
Use this path when Bun, Git, GitHub CLI, Homebrew, npm, or Quarto are blocked. Basic plugin use does not require those tools.
Ask IT or the release owner for one of these approved artifacts:
ce-datascience-plugin.zipfor Claude Codece-datascience-claude-aliases.zipfor optional bare/ce-*aliasesce-datascience-codex-local.zipfor Codex local marketplace installs
Claude Code can load either an approved folder or ZIP:
claude --plugin-dir /approved/path/ce-datascience
claude --plugin-dir /approved/path/ce-datascience.zip
Use namespaced Claude plugin commands:
/ce-datascience:ce-setup --locked-down
/ce-datascience:ce-workflow
Bare /ce-setup is not guaranteed by Claude plugin loading. It works only when
optional local aliases are installed into ~/.claude/commands or a project's
.claude/commands.
To install optional aliases from an approved plugin folder:
bash scripts/install/install-claude-aliases.sh --plugin-dir /approved/path/ce-datascience --scope user
For project-only aliases, run from the project root:
bash scripts/install/install-claude-aliases.sh --plugin-dir /approved/path/ce-datascience --scope project
To remove only managed CE aliases:
bash scripts/install/install-claude-aliases.sh --scope user --uninstall
For Codex without Bun, unpack ce-datascience-codex-local.zip and run:
export CODEX_HOME="${CODEX_HOME:-$HOME/.codex}"
bash install-codex-offline.sh --source /approved/path/ce-datascience-codex-local --codex-home "$CODEX_HOME"
On Windows PowerShell:
.\install.ps1 codex -Source C:\approved\ce-datascience-codex-local -CodexHome "$HOME\.codex"
Then restart Codex, run /plugins, install CE DataScience from the local
marketplace, and restart again. The installer also writes generated agent bridge
files into the selected CODEX_HOME, copies the native plugin under the
marketplace root at .codex/plugins/ce-datascience, and rewrites MCP paths to
that installed local plugin copy. The marketplace entry uses
source.path: "./.codex/plugins/ce-datascience" so Codex can resolve it from
the marketplace root.
3. Source Checkout For Contributors
Bun and Git are required only when building, validating, converting, or developing the plugin from source.
4. Install Source Prerequisites
Install Bun if it is not already available:
curl -fsSL https://bun.sh/install | bash
Restart the shell, then verify:
bun --version
5. Clone Once
Clone the repo and install dependencies:
export CE_DS_REPO="$HOME/ce-datascience"
git clone https://github.com/sajor2000/ce-datascience.git "$CE_DS_REPO"
cd "$CE_DS_REPO"
bun install
Optional sanity check:
bun run release:validate
Expected result: release metadata is in sync, with the current agent and skill counts.
6. Pick Your Agent
Claude Code
Load the plugin directly from the checkout:
claude --plugin-dir "$CE_DS_REPO/plugins/ce-datascience"
Optional shell shortcut:
printf "\nalias claude-ds='claude --plugin-dir %s/plugins/ce-datascience'\n" "$CE_DS_REPO" >> ~/.zshrc
source ~/.zshrc
Then run claude-ds from any project.
In Claude Code, use namespaced plugin commands such as
/ce-datascience:ce-setup. Install optional local aliases only if you need bare
demo commands such as /ce-setup.
Codex, Recommended Mode
Use Codex native plugin install for skills, then add generated agents with the
Bun installer. Use the same CODEX_HOME for both commands.
export CE_DS_REPO="$HOME/ce-datascience"
export CODEX_HOME="$HOME/.codex"

codex plugin marketplace add "$CE_DS_REPO"
cd "$CE_DS_REPO"
bun run src/index.ts install ./plugins/ce-datascience --to codex --codex-home "$CODEX_HOME"
codex
Inside Codex, run /plugins, select the local marketplace, install
ce-datascience, then restart Codex.
For a separate research profile:
export CODEX_HOME="$HOME/.codex/profiles/research"
codex plugin marketplace add "$CE_DS_REPO"
cd "$CE_DS_REPO"
bun run src/index.ts install ./plugins/ce-datascience --to codex --codex-home "$CODEX_HOME"
CODEX_HOME="$CODEX_HOME" codex
Codex, Standalone Generated Mode
Use this when native Codex plugin install is unavailable:
cd "$CE_DS_REPO"
bun run src/index.ts install ./plugins/ce-datascience --to codex --codex-home "$CODEX_HOME" --include-skills
Standalone mode writes generated skills, agents, and managed Codex hooks. Managed hooks preserve manual hooks and hooks from other plugins. Optional MCP integrations remain user-configured.
OpenCode
Install into the workspace where OpenCode should load the plugin:
cd "$CE_DS_REPO"
bun run src/index.ts install ./plugins/ce-datascience --to opencode --output /path/to/workspace
This writes opencode.json plus .opencode/agents, .opencode/skills, and
.opencode/plugins under the workspace. If the output directory itself is named
opencode or .opencode, the writer treats it as a global OpenCode config root
and writes a flat layout instead.
Gemini CLI
cd "$CE_DS_REPO"
bun run src/index.ts install ./plugins/ce-datascience --to gemini --output /path/to/gemini-workspace
This writes .gemini/skills, .gemini/agents, and .gemini/settings.json.
Kiro
cd "$CE_DS_REPO"
bun run src/index.ts install ./plugins/ce-datascience --to kiro --output /path/to/kiro-workspace
This writes .kiro/skills, .kiro/agents, steering files, and MCP settings.
Pi
Install the external Pi subagent prerequisite, then generate Pi files:
pi install npm:pi-subagents
cd "$CE_DS_REPO"
bun run src/index.ts install ./plugins/ce-datascience --to pi --pi-home "$HOME/.pi/agent"
pi-subagents is required for CE workflows that delegate work. Add
pi install npm:pi-ask-user when you want Pi's compact blocking-question UI;
without it, skills use their documented numbered-choice fallback.
Qwen Code
Qwen Code uses its native extension installer:
qwen extensions install sajor2000/ce-datascience:ce-datascience
Qwen is not a generated --to qwen target. --to all only writes generated
targets that are detected on the machine.
7. First Run In A Project
Installation and project setup are separate. First restart the agent, then open the project or study directory where you want help.
For Claude Code, run the native namespaced skills:
/ce-datascience:ce-setup
/ce-datascience:ce-workflow
If optional aliases were installed, the bare forms /ce-setup and
/ce-workflow work too. The namespaced form is the reliable default for a
native Claude plugin install.
For Codex, start a new task in the project and ask:
Use the CE DataScience ce-setup skill for this project.
Then use the CE DataScience ce-workflow skill and recommend the next step.
For generated targets such as OpenCode, Gemini CLI, Kiro, and Pi, restart the
agent after generation, open the output workspace, and invoke the generated
ce-setup and ce-workflow skills using that agent's normal skill interface.
ce-setup inspects the current project and records its stack profile.
ce-workflow reads that profile and existing artifacts, shows the ordered
lifecycle for the project type, data layer, and language, and recommends the
next safe skill. Neither skill performs an analysis merely because the plugin
was installed; the user chooses the next workflow action.
The first pass is evidence-first: setup and workflow inspect existing config, lockfiles, notebooks, IDE files, SAP artifacts, and recent verified connection handoffs before asking. Follow-up questions should be limited to decisions that change generated config, routing, or scientific scope.
Versioned CLIF projects
For a CLIF repository, setup and workflow reuse a matching declared CLIF data dictionary and mCIDE family. When you need to choose explicitly, invoke one of these calls before category work:
/ce-clif --version 2.1.0  # CLIF 2.1 + mCIDE 2.1
/ce-clif --version 3.0.0  # CLIF 3.0 + mCIDE 3.0
An explicit call does not prompt again. If it conflicts with an explicitly declared local or project pair, CE shows the mismatch and asks which source is intended. It never infers CLIF 3.0 from a folder name or missing language signals.
If another skill verifies a database connection first, it can emit a generic handoff such as:
__CE_CONNECTION__ name=healthmap-connection type=postgres database=healthmap_dev auth=entra status=verified
ce-setup uses verified connection handoffs as defaults for database-backed
projects while keeping data_root optional for local extracts/cache files.
Good first workflows:
/ce-research-question "sepsis bundles and 30-day mortality in ICU"
/ce-data-qa
/ce-model-strategy
/ce-plan
/ce-work
/ce-code-review
Those examples use the short names for readability. In Claude Code without
aliases, prefix each one with /ce-datascience:, such as
/ce-datascience:ce-research-question. In Codex, ask it to use the named CE
DataScience skill. Skills operate on the currently open project and should be
given the scientific question, analysis goal, or code task they need.
Fabric and Marimo projects
For Microsoft Fabric, start with /ce-fabric; it routes Lakehouse/Warehouse
coding, Data Factory pipelines, semantic models, ML, and Eventhouse/KQL work to
the matching CE skill. The router keeps the standard data-QA and fail-loud
boundaries in place and does not create cloud resources or guess workspace
identities.
For reactive Python notebooks, use /ce-marimo. It creates or reviews
text-native Marimo .py notebooks, preserves reactive cell dependencies, and
requires a marimo check validation pass when the project runner is
available.
For R-first projects, start with /ce-rstats. It routes to R review,
tidyverse, event-study, package, CRAN, performance, and targets workflows
while preserving the same estimand, data-QA, and reproducibility expectations
as Python projects.
Before planning or modeling, keep the integrity gate in place: ce-data-qa
reconciles rows and joins, validates keys and types, and records missing-data
handling. It returns NO-GO for confirmed corruption or undeclared
synthetic/fallback data. Use ce-model-strategy after QA and before SAP
finalization when the model choice is nontrivial. For observational or causal work, planning requires an
estimand, analysis grain, keys, time zero, assumptions, and success criteria;
unresolved methodological choices remain analyst questions.
For dynamic survival models, ce-code-review routes to the calibration reviewer
for decision-aligned, censoring-aware time-dependent AUC rather than treating a
generic AUC or C-index as sufficient. For claims-based studies, use
/ce-plan for the canonical SAP, then add /ce-statistical-analysis-plan when
the design needs linked claims, datasets, variables, diagnostics, outputs, and
decision evidence. /ce-sap-tabular owns the workbook companion.
Each public skill starts with a Skill Value block that names the problem it
solves, when to use it, expected output, when it should ask questions, and what
it should not do. Use that block to choose the right slash command during a demo
or first project walkthrough.
For publication artifacts:
/ce-table1
/ce-figure
/ce-manuscript-package
/ce-review-pack
For a manuscript handoff, assemble artifacts with /ce-manuscript-package,
resolve editable Zotero fields with /ce-manuscript-citations, run
/ce-pre-submission-audit as the combined final editing gate, and finish with
/ce-review-pack. The focused voice, section-discipline, and anti-slop skills
remain available for targeted passes; section discipline preserves rationale
required by reporting guidelines, protocols, regulations, or reproducibility
standards.
For locked-down laptops, run setup in no-install mode:
/ce-datascience:ce-setup --locked-down
This reports missing tools but does not offer Homebrew, pip, npm, GitHub CLI, or Quarto install commands.
8. Optional Research Add-ons
CE DataScience works without external research services: /ce-pubmed uses the
bundled NCBI E-utilities workflow, and /ce-evidence-map falls back to that
PubMed baseline. For deeper scientific research and planning, consider one of
these optional add-ons:
| Add-on | Recommended when you need | Connection |
|---|---|---|
| PubMed MCP Server | Agent-native PubMed and Europe PMC search, MeSH lookup, related/citing articles, identifier conversion, citation formatting, and available open full text | Prefer local stdio with npx -y @cyanheads/pubmed-mcp-server@latest; a public hosted endpoint is also available from the project |
| Paperclip | Full-text corpus search, parallel evidence extraction, claim verification, figures, regulatory documents, trials, preprints, and biological databases | Install the CLI and Paperclip's official agent skill in your own terminal, or configure its hosted MCP endpoint |
Choose the PubMed MCP server as the lightweight default for biomedical search and research-question refinement. Add Paperclip when the project needs deeper full-text synthesis or sources beyond PubMed. They can be used together: PubMed remains the canonical metadata baseline, while Paperclip deepens selected claims and methods against full text.
For Word manuscript citations, use the ce-manuscript-citations skill after
installing or connecting PubMed MCP and, when permitted, Paperclip. It keeps
PubMed identifiers and Paperclip claim evidence in a citation ledger, then uses
Zotero-owned Word fields for the editable DOCX master. Static superscripts and
typed bibliography entries are not treated as editable citations.
CE's artifact-producing workflows currently auto-detect only the Paperclip CLI.
PubMed MCP and Paperclip's external skill or MCP server are direct agent
capabilities; CE does not automatically translate their results into the
__CE_PUBMED_RESULTS__ CSV handoff or __CE_EVIDENCE_MAP__ artifact. Continue
through /ce-pubmed and /ce-evidence-map when downstream CE skills need those
handoffs.
Example local PubMed MCP configuration:
{
  "mcpServers": {
    "pubmed-mcp-server": {
      "type": "stdio",
      "command": "npx",
      "args": ["-y", "@cyanheads/pubmed-mcp-server@latest"],
      "env": {
        "MCP_TRANSPORT_TYPE": "stdio",
        "MCP_LOG_LEVEL": "info",
        "NCBI_API_KEY": "your-optional-key"
      }
    }
  }
}
Remove NCBI_API_KEY when no key is available. Follow the add-on's client guide
for the correct MCP configuration file and restart the agent after changing it.
For Paperclip, follow its current installation guide, verify CLI access with
paperclip config, then install the official Paperclip skill from Paperclip:
paperclip install
paperclip install provides an interactive agent picker and fetches the skill
from Paperclip. Use paperclip install --dir /path/to/project for a specific
project. Agents should load the provider's current instructions with
paperclip skill before Paperclip work. CE DataScience links to this external
skill; it does not vendor, fork, or maintain it.
Privacy and network safety: both add-ons are third-party services. Review their
licenses, data handling, network destinations, and institutional policy before
use. Never send protected
health information, credentials, private manuscripts, or confidential research
queries to a hosted endpoint without approval. Prefer local stdio where policy
requires local process control. CE DataScience must not install or authenticate
either add-on automatically. Explicitly running /ce-evidence-map authorizes
its documented optional deepening: when the Paperclip CLI is installed and
authenticated, that workflow may contact Paperclip. Use /ce-pubmed alone when
Paperclip network access is not permitted.
9. Update An Existing Checkout
cd "$CE_DS_REPO"
git pull
bun install
bun run release:validate
Then restart the agent. For generated targets, rerun the install command for that target so generated files and MCP paths refresh.
10. Build Offline Artifacts
Release owners with a working source checkout can build the corporate ZIPs:
bun run package:corporate
The build writes:
dist/corporate/ce-datascience-plugin.zipdist/corporate/ce-datascience-claude-aliases.zipdist/corporate/ce-datascience-codex-local.zip
Troubleshooting
| Symptom | Fix |
|---|---|
bun: command not found | Re-run the Bun install command, restart the shell, and check bun --version. |
Claude says /ce-setup is unknown | Use /ce-datascience:ce-setup, or install optional local aliases. Restart Claude Code after installing a plugin or aliases. |
Windows PowerShell cannot run bash install.sh | Use .\install.ps1 claude -Aliases or .\install.ps1 codex. Use Bash commands only in WSL or Git Bash. |
| Corporate laptop blocks Bun, GitHub CLI, Git, or Quarto | Use the approved Claude plugin folder/ZIP or Codex local marketplace package. Bun and Git are source-build tooling; GitHub CLI is only for GitHub helper skills; Quarto is only for Quarto render workflows. |
| Paperclip is missing or blocked | /ce-evidence-map still works from PubMed-only evidence. Paperclip is optional for full-text, result-set grep/map, SQL, and figure deepening. |
Local install says it cannot find plugins/ce-datascience remotely | Use ./plugins/ce-datascience from the repo root, including the leading ./. |
| Codex installed into the wrong profile | Set CODEX_HOME and pass the same value to --codex-home. |
| Codex has duplicate or stale CE files | Rerun the Codex installer for the same CODEX_HOME; managed artifacts are namespaced and stale managed files are cleaned. |
OpenCode did not create .opencode/ | Do not use an output directory named opencode or .opencode when you want workspace nesting. Use a normal workspace path. |
| MCP writes reports into the plugin cache | Set CE_DATASCIENCE_PROJECT_ROOT=/absolute/path/to/project or pass project_root where the MCP tool supports it. |